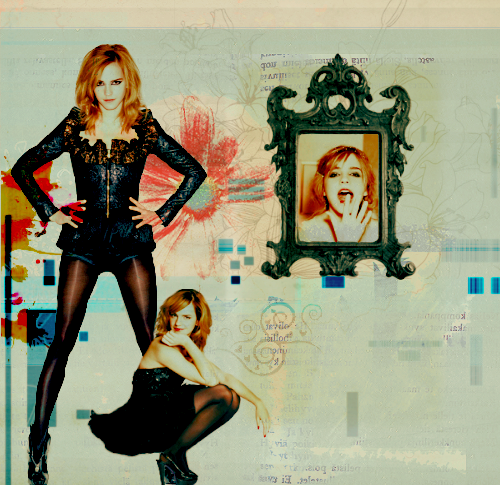
Ok, so I promised someone I was going to make them a graphic tutorial. Since I have NO idea who it was, this is going to be for who it was. I have a feeling it was Melly, but if not, feel free to correct me : )
So, open a new canvas with the size of 500x485 and paste this picture one it.
Background Once that is done, put this picture of Emma Watson anywhere you like. I’m placing mine to the left of my canvas. Also, you may want to resize it. When you place the image on there, you can do a cheat and set it for darken or multiply or use a hard cut and cut her out. For this, I’m doing a hard cut.
Emma Watson *make sure to click on the image*
After that, I used another Emma picture. This time though, I resized it and set it to darken and placed it in the picture frame.
Emma Watson And just because I love Emma…I added another picture and did another hard cut. You can also use the cheat way again. I had to resize this also.
Emma After that, I put this texture on there, set it to darken, and removed the parts that covered the face in the picture frame.
TextureI took the picture in the left corner, cut it out, resized it and placed it right by the sitting Emma. I duplicated it so it was a bit darker. This was set on softlight but the second one was set to 49%
CLICK I placed another texture on there and set it to multiply with a 71 opacity.
Texture 2Ok, so I do my curves layer like this. To get to curves, go to Layers>>Adjustment Layers>> Curves.
Make sure to follow the dot in the MIDDLE not the numbers.
Curves Go to Layers>> Adjustment Layers>> Color Balance
Put these in for each one:
Midtone: 26 13 11
Shadows: -76 -40 -31
Highlights: 17 18 18
Make sure Preserve Luminosity is checked.
Go to Channel Mixer (use the same way you got to curves)
Make sure output channel is on red and put these in
Red: 110 Green: -19 Blue: 15
Change output level to green.
Red :-15 Green: 107 Blue: 10
Change output level to blue
Red: -28 Green: 10 Blue: 114
Go to Layers>>Merge>>Merge All. Copy the image and set it as a layer. Set it to difference with 20 opacity.
Set a new raster layer and use your paint bucket. Set the color for #EAFBFC set the layer on softlight 16% then make a new raster layer and use the color #FCF4EA set it for burn 100% once again, set another new raster layer and set the color for #FCECEA on multiply 30%.
Take your background layer once again (the one we merged) and set it on screen 50%
Take the new texture and set it for darken 61%
Texture 3 Go to Layers>>Adjustment Layers>> Bright/Contrast
Brightness: -15
Contrast: 9
Go back to Channel Mixture and put this in once more
Red:
Red 114
Green -15
Blue 12
Green:
Red -26
Green 110
Blue 24
Blue -26
Green 8
Blue 116
Go to Layers>>Adjustment Layers>> Levels
Channel RGB
Input Levels
0
1.17
255
Red:
0
1.07
255
Green:
0
1.06
255
Blue:
0
1.12
255
And there you go! I tried to make this as easy as I could. If you have any questions, let me know!


