BlendingIn the tutorials, you'll often hear me refer to blending. Good blending is something that takes time to learn - and I will admit that I'm still not that brilliant at it.
I know three methods of blending, and if you try all three out you will probably find the one that suits you best.
Method One: FeatheringBlending using feathering is quite imprecise, but can be neatened by using the eraser tool.
To practise feathering, we'll use the following images:
TextureWilliam Moseley1. Open both images into your graphics program.
2. Choose the freehand selection tool, and as neatly as possible, outline William Moseley's body, as shown below:

3. Now to feather the image. Go to:
Selections >> Modify >> Feather
In the box that opens up, enter '30' and press OK. You should see the floating selection line jump outwards a couple of centimetres.
4. Press copy, and then right click onto the texture, and choose 'paste as new layer'. You can use the layer mover tool to position the image, and if you wish to neaten it up, you can use the eraser.
By altering the number you put into the feathering box, you can choose how much of the original image is taken away. The higher the number, the more ?faded? the image will look. Of course, this is only an example, and I?ve used two very contrasting colour schemes with the images. When working on a proper graphic, you should be more precise.
Method Two: Elliptical SelectionThis method will only work in cases where you're overlapping two images with straight edges, for example, to create a background for a graphic. This isn't the method to use when trying to blend neatly and precisely.
To practise, we'll use the following images:
Clock TowerApple1. Open both images to your graphics program, and create a new canvas at a size of 450x200.
2. Copy and paste the clock tower onto the canvas. It should fill the entire area. Copy and paste the apple picture onto the left hand side of the graphic. You should have something like the following:

3. Click onto the rectangular selection tool, and open the Tool Options Window. In the window, select ?Ellipse? as the selection type, and set the 'Feather' option to 30.
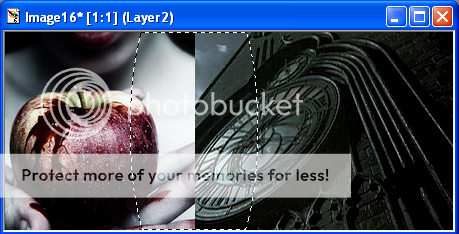
4. Back to the graphic. In the place where the two images meet, click with the selection tool and draw a medium sized ellipse:

5. Hit the 'delete' key a couple of times. The area inside the ellipse will disappear, blending the two images together.
Method Three: The Eraser ToolThis is my third and preferred method of blending, as I believe it is the simplest and yields the best results.
As it would be quite hard to illustrate how to blend using the eraser tool, there's no step-by-step example this time, however it involves simply erasing the parts of an image that you don?t want.
You can alter the size, opacity and hardness of the eraser tool to suit your purpose, and I find zooming in very close on the image allows you to blend precisely.
If you right click when using the eraser tool, you can undo any mistakes you've made. This method is the easiest once you get the hang of it, but it may take some time to get used to it.


