Basic Blending MethodsThis tutorial will outline some of the basic blending methods I know and use most often. My program is, PSP X2, but the tutorial is translatable.
Hard Cutting/ErasingThis is more of a series of tips than an actual tutorial, as this type of blending is pretty much down to common sense.
This method gives you the most precise control over what you’re blending. It is simply erasing everything around the image you want to use, giving you nice clean edges around the focal character or picture.
It’s probably easier said than done, as you need a steady hand to create smooth lines, and patience when working on an image with lots of in-and-outs.
I usually set my eraser brush to size 10, with a hardness of 50. This gives you a small enough brush to have control over what you’re erasing, and the hardness is just right so as not to make the edge too blurry or too jagged.
Then, it’s simply a case of zooming right in to the image and erasing everything you don’t want. The closer you zoom in to the image the better, but remember to zoom out occasionally to make sure that you’re not erasing too much or too little.
I usually always erase onto a transparent background, however a good tip is to create a new layer beneath your main image, and flood fill it with a dark colour. This allows you to check and see if you’ve missed any bits of background that may not have been visible on the transparent canvas.
Example:
 The Ellipse Tool & Feathering
This is an easy method for when you want to quickly and seamlessly blend two straight edges together.
In this example, I want to blend the following two pictures of SMG together, onto a new banner:

1. Resize your images to whatever you need them to be for the banner. If they lose clarity, sharpen them up a little.
2. Paste each image as a new layer onto your blank canvas, and position accordingly. As you’ll see in the example below, the images overlap with a hard line between them.

3. Next, take your selection tool, and change the Selection Type to Ellipse, and the Feather to around 30-35.

4. Draw a circle on the banner, at the point where the two images overlap:

5. Release the mouse and the circle will jump outwards and become a floating selection:

6. Hit delete on your keyboard, making sure you’re working on the top layer. You may need to hit delete a couple of times to remove all of the straight edge.
Final result:
 Changing the Blend Modes
Sometimes you don’t even need to hard-cut, erase or feather an image if you change the blend mode. I always see if I can get away with just altering the blend mode before trying any of the other methods, as it is by far the quickest and easiest.
Lighten/DarkenIf the graphic you’re making has a dark background layer, and the image you want to blend in is fairly light, it’s always worth checking to see if you can use the Lighten or Darken Blend Modes.

To
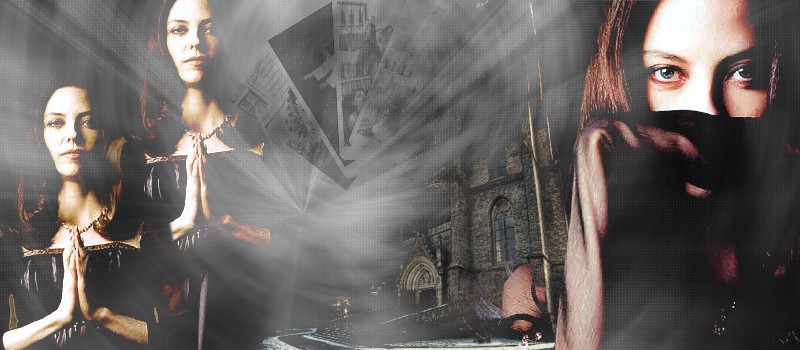
For this banner base, I use the Lighten and Darken blend modes to fit all the images onto the background.
You can see that my background base is a couple of dark grey textures, with lighter areas throughout. I simply pasted on my chosen images, and changed the blend modes. All three Drusilla’s are set to Lighten, the church is on Lighten, and the pack of tarot cards are on Darken.
They have all now blended seamlessly into the background with very little work. You may need to use a soft eraser brush to get rid of any visible hard edges or parts of the images you don’t want (eg. I erased part of the road in front of the church).
Screen/Hard Light/Soft Light
To
On this banner base, I’ve blended in a church, Buffy and a clock using the Screen, Hard Light and Soft Light blend modes.
I pasted on my images, each as a new layer onto my blue background texture – without having done any preparation to them – and changed the blend modes.
The church blend mode was set to Hard Light at 100 opacity, Buffy was on Screen at 100 opacity, and the clock was on Soft Light at 25 opacity.
You may need to erase some areas of the images (for example, I erased parts of the church) for everything to look good.
Very easy and the final result looks great.
Other Blend ModesThe other blend modes, such as Overlay and Burn can also be used, depending on the images. I tend not to use the others as much and so don’t have any examples to show. But just play around, experiment to find what works best for you.
**
Those are the different blending methods I use when making graphics. I’ve never got the hang of Layer Masks – I prefer to use one of the above – but I’ve heard it’s a good method to use once you know how.
Any questions, please ask